Imaginative Realities
Cyber Security and Stray Thoughts
28 October 2022
Rsync and Cron for Manual Network Backups
by Chris
I’ve got a Synology Network Attached Storage (NAS) appliance with the DiskStation Manger (DSM) OS and so far I’ve been happy. While Synology has its own apps to provide backup capabilities, and there are other 3rd party options, I wanted to learn more about a ubiquitous service on Linux distributions called rsync. Though rsync can run through manual input, I also wanted to create scheduled backups, so that is where Linux’s native automation service cron comes in.
Rsync is a file copy program that can copy files between network locations among its many features. One of rsync’s capabilities provides this copy feature over ssh. I have some familiarity with ssh from playing with headless Raspberry Pis, so this seemed like a natural next step for me. Plus, its pretty handy that more than a few Linux distributions come with rsync already installed.
For this guide we’ll start with some configuration of both the Linux client and Synology server. Next, we’ll configure the ssh session to run smoothly in anticipation of automating with cron. Last we’ll set up the cron tasks to schedule the backup scripts with the backup locations we want to duplicate on the NAS. You’ll need a few things before we begin:
- You’ll need to know the IP of your NAS
- You’ll need access to the web console of your NAS (usually the IP with :5000 after it)
- This guide assumes you have some knowledge of how and when you should use sudo for elevated privileges
Preliminary configuration of rsync
These instructions are in part derived from the official Synology page on rsync.
Ensure you have rsync installed
Lots of distros come with rsync already installed. Just to check, you can run:
rsync --version
If that returns an error or nothing then I’d recommend searching your package manager to find rsync and install. Using openSUSE I’d head over to the zypper package management program, though for others could be something like:
apt-get search rsync
Same process for the ssh command line program. This is even more common than rsync, but just to check, run the following:
ssh -v
If you get an output that begins with “usage:” and is followed by a variety of letters with short explanations in brackets, you’re all set. If not, back to the package manager and search for a package like “openssh.”
Enabling rsync on Syology DSM
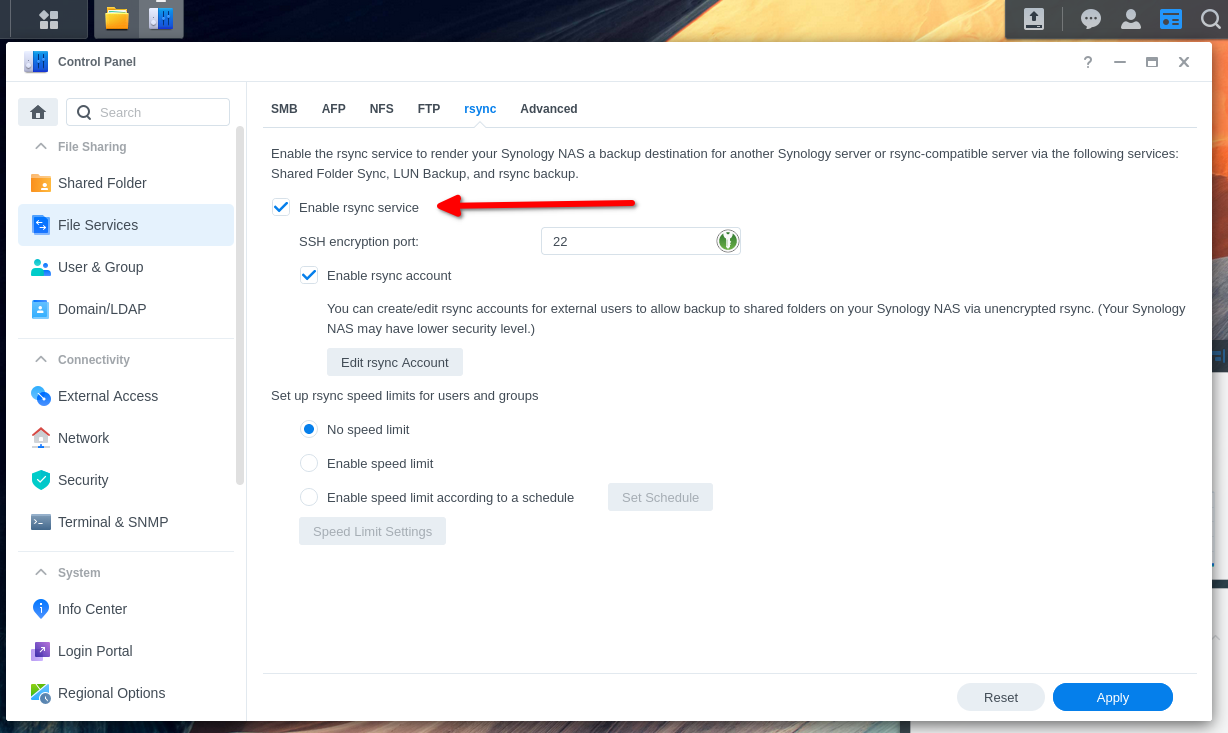
Head over to your Synology console and sign in. From there open the control panel and type “file services” into the search box at the top left of the window.
That will take you to a new panel. Select the rsync tab at the top and check the checkbox next to “Enable rsync service.”
Next we’ll set up a user for rsync on the NAS. If you already have a separate user created apart from the default admin and guest users, you can assign it the rsync service by heading over to the same control panel of the web console and typing “user & group” in the search box. Select the edit button for the user and select the applications tab to find rsync and allow.
If you don’t already have a separate user on your NAS that you’d like to use for rsync you can create one using the following instructions:
- In the same control panel of the web console go to the search box and type “user & group.” That opens a panel with a tab called “User.” Select the create button, and call the user whatever you want. Add a strong password of at least 8 numbers, letters, and symbols and select next.
- The user only needs default “users” group, so select that and hit next. This will create a folder called “NetBackup” for your user. Make sure you have the read/write box checked for that folder. Select next.
- If you don’t know what quota is, you probably don’t need to worry about that, select next.
- For assigning application permissions, find the rysnc service and check allow. Select next.
- If you don’t know what user speed limit settings are then they are probably not applicable, so hit the final next and you’ll be given a summary to approve.
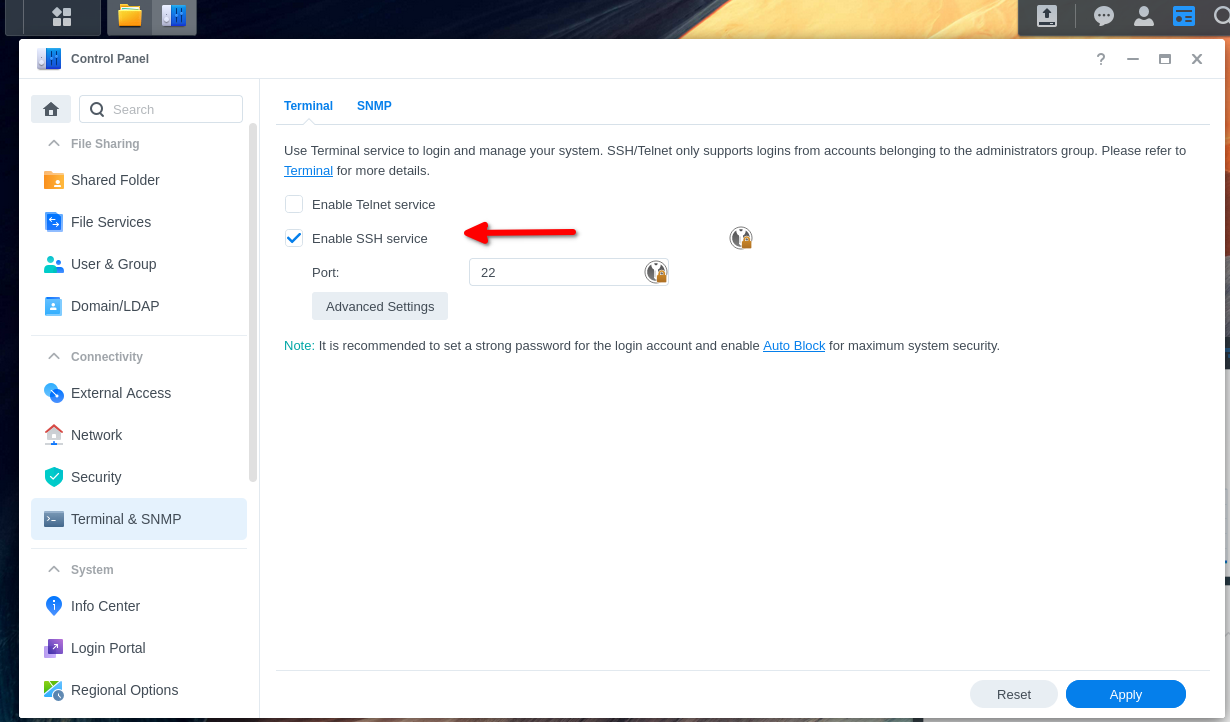
Enable SSH on Synology DSM
Later it’ll be necessary to have ssh enabled on both the Linux client and Synology server in order to exchange the public key. So next we’ll set up the ssh server on Synology NAS box. To do this, we’ll head over to the control panel again. Search for terminal & snmp. This should land you on a tab called terminal where you want to check the box for “Enable SSH service.”
File and folder config on Synology DSM
There is a bit of setup required for permissions on the folders related to ssh that is not pre-configured in Synology DSM. To accomplish this we’ll move out of the Synology web console and open a remote shell on the Linux client we’re going to backup. First we need to connect by ssh into the Synology NAS now that we’ve enabled ssh logins. Open a terminal on your Linux client and type the following, making sure to loose the brackets and substitute your options:
ssh [useryoucreatedabove]@[IPofyourNAS]
You’ll need the password you just created for the new user when prompted. Next, change to the home directory of the user you just created:
cd /volume1/homes/[useryoucreatedabove]
Make a directory for ssh:
mkdir .ssh
Give your user ownership over it:
chown [useryoucreatedabove]:users .ssh
Now ensure the .ssh directory has the right permissions (read, write, execute for your user, nothing for anyone else):
chmod 700 .ssh
Change directory into the new folder:
cd .ssh
Create a file named authorized_keys:
touch authorized_keys
Ensure that authorized_keys has the right permissions (read and write for you, read-only for groups and others):
chmod 644 authorized_keys
If you now list the contents using ls with the -al flags, you can see what your authorized_keys files has the following next to it: -rw-r–r–
As an aside, it’s customary to mention here that the home directory shouldn’t be writable by anyone besides your user, so it should have at most 755 permissions (drwxr-xr-x). To check that you can type:
ls -al /volume1/homes/[useryoucreatedabove]
Passwordless SSH connections
Now we’re done configuring the Synology NAS box through the remote shell. We can exit that shell, and begin to configure our ssh connection to the NAS box using keys. On the Linux client we’re going to run the keygen command to create an asymmetric key pair consisting of a public and private key. SSH has a nice routine for that, so we’ll use:
ssh-keygen
By default this generates an RSA keypair. According to the ssh manual pages this is a default of 3072 bits which is fine (as of 2022). It will further ask whether you want non-default storage locations and a passphrase. The options aren’t too important, though it will make your life more complicated if you opt to give the key a passphrase. Assuming that readers are setting this up in a Small Office/Home Office (SOHO) environment, you’ll probably be okay without setting a passphrase for the key pair. If you do set a passphrase, you’ll have to alter config files down the road to include the passphrase in order to automate the script (won’t be covering that in this guide).
Transferring the public key
Once the keygen command runs successfully, you can use the secure copy mechanism built into ssh to copy the public key over to the SSH server. In my case the ssh server is the Synology NAS.
ssh-copy-id [useryoucreatedabove]@[IPofyourNAS]
Optional: configuring alternative key paths
If decide to name your key something different than the default you’ll have to make some modifications in order to sign in. You’d need to use the -i flag in the command above along with the location/name specified in order to transfer the right key. You’d also need to take those modifications into account in the next step. Specifically, you can set the modified key’s location in the ssh config file for the NAS hostname. To demonstrate, follow these steps:
First, create a config file in your home directory .ssh folder.
touch config ~/.ssh/
Next you’ll want to open that file with your favorite editor:
nvim ~/.ssh/config
Place the following inside the config file, replacing the verbiage in brackets with your own options.
Host [give your NAS a name here]
	Hostname [Hostname or IP for your NAS]
	User [useryoucreatedabove]
	IdentityFile ~/.ssh/[name of your private key (doesn't have .pub extension)]
	IdentitiesOnly yes
The first line sets a nickname for ssh to use in establishing connections. Hostname defines your NAS location; User defines your rsync identity in Synology DSM; IdentityFile creates the path to your modified key; and IdentitiesOnly ensures that ssh “should only use the configured authentication identity and certificate files (either the default files, or those explicitly configured in the ssh_config files or passed on the ssh(1) command-line)” for sign in.
You should be able to test the config file without restarting ssh services by simply using the ssh command and your entry for the Host line:
ssh [the "Host" name you gave above]
Assuming that all works to connect to a remote shell on your NAS, you should be ready to test rsync.
Testing rsync
Before we automate an rsync script in cron, lets just make sure that rsync can connect manually. If you are using a default key created by ssh, then you’d connect using this type of command. For example, if Michael Scott wanted to back up his home folder, he might enter this:
rsync -avz -e ssh /home/michael_scott/ [useryoucreatedabove]@[IPofyourNAS]::NetBackup
To explain the command a little, the -a flag sets archive mode, which the documentation in rsync lays out nicely as, “archive mode…ensures that symbolic links, devices, attributes, permissions, ownerships, etc. are preserved in the transfer;” the -v flag is for verbose; the -e flag enables a remote shell option and allows you to specify ssh as the program to handle the connection; and the -z flag compresses the files during the transfer; a useful option for large files.
Alternatively, if you are using a modified key, then you’ll have to make some additions to indicate where the key is:
rsync -avz -e "ssh -i ~/.ssh/[pathtoyournewkey]" /home/michael_scott/ [useryoucreatedabove]@[IPofyourNAS]::NetBackup
That command should begin copying your files between your client and server. If you plan on using these modifications in automating, you’ll have to continue to use the -i flag along with the path to the irregular key location in cron.
Automating rsync commands with cron
Now we are ready to create a schedule of rsync backups similar to one we implemented above. First, we’ll create a regular daily backup schedule creating files that won’t be deleted for a period. That way we’ll have versions of files we’ve moved or deleted available on the NAS for a short time period. Then we’ll create another cron job with the same command but with an additional –delete flag to clean up those files that you no longer have in your directory. Depending upon when a file or folder is moved/deleted, you’d have it remain available on the NAS for up to a month set up depending on when the original was deleted.
For the initial backup run, we’ll first open the cron editor:
crontab -e
In my distro this just opened a blank page, but this was nevertheless the right command. To use cron you’ll enter a time in cron’s specific format, followed by the rsync command you used above. For example, to run the rsync command once a day at 1:30 p.m. you’d enter the following:
30 13 * * * rsync -avz -e ssh /home/michael_scott/ [useryoucreatedabove]@[IPofyourNAS]::NetBackup
Cron does have a bit of a tricky syntax to learn, but if you’d like to simplify things you can always use a cron calculator like this one.
That command will create a backup of the home folder in your NetBackup folder. Next, we’ll implement a delete command to clear deleted files once a month on the 15th day at 1:30 p.m. To create a rsync command that deletes files that Michael Scott has removed from his home folder, you’d use the following:
30 13 15 * * rsync -avz -e ssh --delete /home/michael_scott/ [useryoucreatedabove]@[IPofyourNAS]::NetBackup
If you get an “error in rsync protocol data stream (code 12) at token.c(XXX),” then try without the compression flag -z.
And that’s it! Now you have a functioning automated backup. If you ever want to ensure that the backup is running you can always check the system log for cron entries like this:
journalctl | grep crond
It should show entries corresponding to the times that you’ve set up in cron if all is well.
Thanks for reading along!
tags: